Global settings, users, and providers#
Open Settings from the account footer or the collapsed sidebar gear. The page has six tabs: Appearance, Notifications, Agents, Users, Updates, and Info.
Appearance#
Choose how Remote looks on the current device:
- System follows the browser or operating-system preference.
- Dark always uses the dark theme.
- Light always uses the light theme.
The preference is saved to your Remote user settings. Wait for the Saved state before leaving if the network is slow.
Agents#
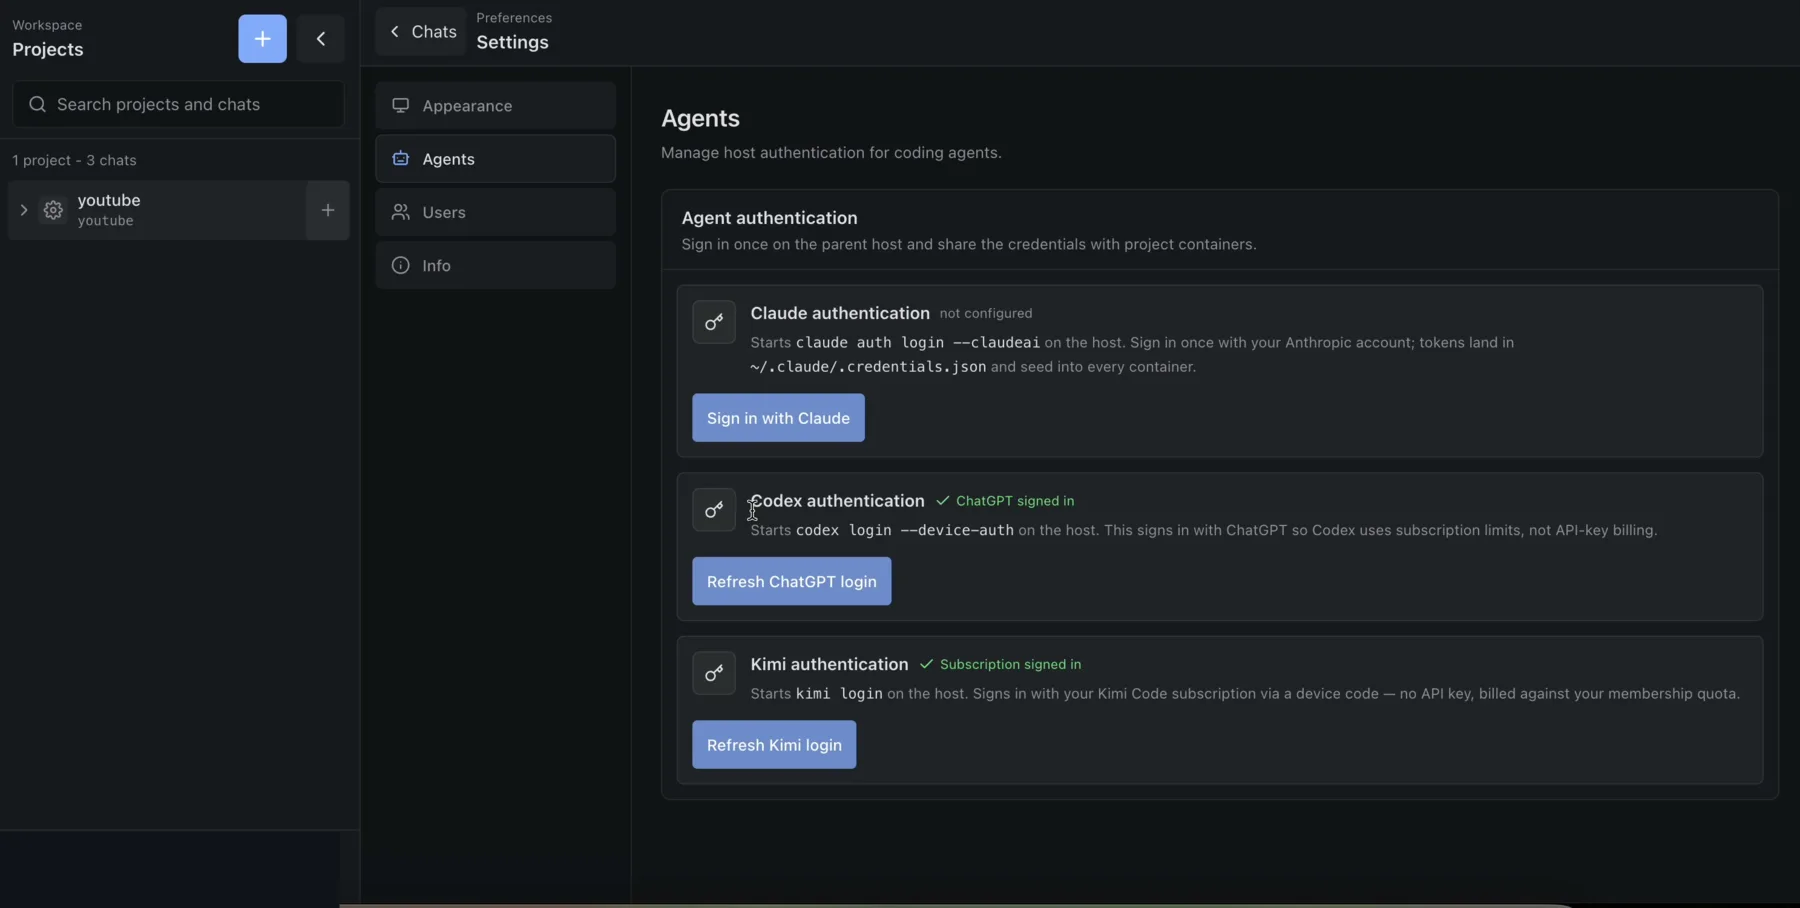
For an administrator, the Agents list is generated from the server's ordered agent module catalog. Each card uses the module label, authentication mode, current normalized status, and provider-owned instructions. Managed authorization-code and device flows expose the appropriate controls; external providers show their sign-in instructions without a host-login button; a no-auth module is reported ready without login controls.
Claude, Codex, and Kimi authentication is host-wide and administrator-managed. Sign in once on the parent host; Remote then seeds those provider credentials into project containers. MiniMax uses a host-managed Token Plan subscription key. Antigravity uses a project-local sign-in flow; both are described below.
Connect Claude#
- Open Settings → Agents.
- Under Claude authentication, choose Sign in with Claude.
- Open the displayed Anthropic authorization link.
- Complete sign-in in the new tab.
- Paste the returned code into Remote.
- Choose Submit code.
- Wait for Subscription signed in.
Use Refresh Claude login to replace an expired or unwanted host credential. When Remote detects the completed login, it requests a refresh for model catalogs currently open in that browser. A project probe sees the credentials currently present inside its container, so if a later run propagates new host credentials, choose Refresh models again afterward.
Connect Codex#
- Under Codex authentication, choose the device-login action.
- Open the verification URL.
- Enter the displayed device code.
- Approve the OpenAI account.
- Return to Remote and wait for the connected state.
Remote may also detect a configured API key, but subscription/device authentication is the intended shared-host flow.
Use MiniMax#
MiniMax is project-only and runs MiniMax-M3 through Remote's pinned Codex app-server harness. It deliberately uses an isolated /root/.minimax home, so its model catalog, sessions, and provider settings do not replace the normal Codex account or /root/.codex state. This is runtime separation, not a security boundary: container root can read every provider home mounted in that project.
Configure MiniMax once for the Remote installation:
- Open Settings → Agents and choose Sign in with MiniMax (or Refresh MiniMax login when replacing a key).
- Follow the Get a MiniMax Token Plan subscription key link to subscribe, create, or retrieve the supported key from MiniMax. Remote does not link to the pay-as-you-go key console because standard API keys are not supported.
- Paste the
sk-cp-…key into the masked field and choose Save API key. Remote checks that it is a Token Plan key and validates it with MiniMax's subscription quota endpoint before storing it. - Return to a project chat and select MiniMax and MiniMax-M3.
Remote passes the key to the Codex process as an environment variable and configures Codex to read that variable. It does not embed the key in the generated model catalog or command-line configuration. The key is never returned to the browser after saving. MiniMax is not offered for loose chats. In project chats it stays visible as a locked Sign in to use provider, but its model list remains unavailable until a validated key exists.
Connect Kimi#
- Under Kimi authentication, start device login.
- Open the verification URL.
- Enter the displayed code.
- Approve the account.
- Return to Remote and wait for the connected state.
Use Antigravity#
Antigravity appears in both the chat provider picker and the administrator's global Agents list. Its card is informational and marked provider-managed: the agy CLI does not expose a host-wide sign-in flow that Remote can complete and distribute, so Remote's supported sign-in workflow is project-local.
Sign in separately in each project:
- Open a chat in the project.
- Select Open Terminal.
- Run
agy. - Complete the URL-and-code flow displayed by Antigravity.
- Exit the interactive CLI.
- Return to the chat and choose Refresh models in the provider/model picker.
- Select Antigravity and a discovered model.
That sign-in is shared with other users and agents inside the same project container. Its files under /root/.gemini/antigravity-cli are a durable provider-home mount. They survive ordinary stop/start and container replacement; unrelated files elsewhere under /root/.gemini do not.
Remote cannot observe this terminal-based login, so it cannot invalidate the model cache automatically. Use Refresh models after every Antigravity sign-in or account change.
A loose chat can probe agy state that an operator configured directly on the host, but Remote has no UI for establishing that state and its project Terminal is unavailable to a loose chat. Use a project chat for normal Antigravity work.
Antigravity does not satisfy Remote's initial provider gate because Remote cannot observe external auth authoritatively. A server administrator must still connect one of the current gate-eligible modules: Claude, Codex, or Kimi.
Shared-provider implications#
- Every user and project shares the same host Claude, Codex, and Kimi accounts and their quotas.
- Those three provider credentials are copied into project credential locations.
- An agent that can read its project credential files can act with that provider authority.
- Claude, Codex, and Kimi homes are durable but separate by provider format, not separate security principals.
- Re-authentication can affect every project.
- Antigravity is project-local rather than host-wide, but its credential state is still readable by container root and shared by everyone with authority in that project.
- MiniMax runs only in projects, but its Token Plan subscription key is installation-wide and administrator-managed. It is injected into MiniMax runs and is subject to that MiniMax subscription's quota.
Non-admins can use connected providers but cannot connect or refresh them.
Users#
Remote has one local password administrator. Additional users sign in through Google OAuth and must be registered before they can enter.
Configure Google OAuth#
Administrator steps:
- Create an OAuth web client in Google Cloud.
- Add the callback URL shown in Settings → Users.
- Copy the Google client ID and client secret into Remote.
- Save and confirm that Google sign-in is enabled.
The Google client secret is stored on the host in plaintext with restrictive file permissions.
Current authentication caveat: Remote authorizes Google users by normalized email, does not check Google's
verified_emailclaim, does not bind invitations to the immutable Googlesub, and does not enforce a hosted-domain (hd) restriction. Treat invitations on custom domains with care and read the threat model before enabling multi-user access.
Add a user#
- Open Settings → Users.
- Enter the user's exact Google-account email.
- Choose member or admin.
- Choose Add.
- Add a member to specific projects through each project's Sharing tab.
There is no public sign-up. A successful Google identity that is not in the user directory is denied.
Change a role#
Administrators can promote a member to admin or demote an invited admin to member.
- An admin can manage global providers, Google OAuth, users, all projects, resource limits, and deletion.
- A member sees only projects where their email is a member, plus any loose chats.
The local administrator cannot be removed or demoted. Remote also prevents removal or demotion of the final administrator.
Remove a user#
- Find the user under Users.
- Choose the remove action.
- Confirm that access should end.
Removal blocks future authenticated requests for that email. Sessions are stateless 30-day tokens and have no individual revocation UI; deleting a user is the practical access-control lever.
Info#
Use Info to inspect the parent host rather than one project container.
The page reports:
- current account email and role;
- server URL and collection time;
- CPU model, usage, load, and core counts;
- total, used, available, cached memory, and swap;
- filesystem mounts, capacity, used space, and free space;
- interfaces, addresses, and traffic counters;
- operating system, kernel, architecture, Go version, and uptime;
- backend PID, goroutines, file handles, heap, and system memory;
- configured application and storage paths.
Choose Refresh for a new point-in-time sample. These readings are operational observations, not performance guarantees.
Sign out#
Use the sign-out control in the account footer. This clears the platform session cookie from the browser. It does not disconnect host-wide agent-provider accounts.
Access summary#
| Settings action | Admin | Member |
|---|---|---|
| Change own appearance | Yes | Yes |
| View own account and server information | Yes | Yes |
| Connect or refresh agent providers | Yes | No |
| Add, replace, or remove the MiniMax Token Plan subscription key | Yes | No |
| Sign in to Antigravity inside an assigned project | Yes | Yes |
| Configure Google OAuth | Yes | No |
| Add, remove, promote, or demote users | Yes | No |
For the full sign-in state machine and proxy checks, see Authentication, users, and access.